![]()
Promoting the Bagpipe Revival since 1986
The Bagpipe Society
Making reeds for a boha in G
During a conference in Barbaste in 2012, Robert Matta gave a detailed demonstation of his manufacturing technique for his boha reeds. After numerous experiements, he determined the dimensions and measurements that best suited his bagpipes. Only a few materials are required, just a Plexiglass body and a strip of carbon fibre or cane. Then, having assembled the reed, all that is required is to vary the thickness of the carbon fibre or cane strip to refine the setting.
In the following instructions, manual alternatives have been added for those that do not have the necessary tools.
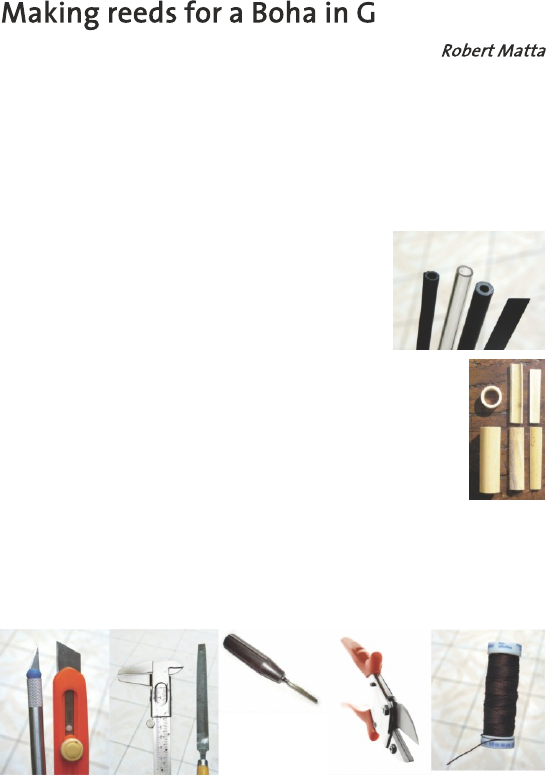
Materials required
· Plexiglass tube: 7mm external and 5mm internal diameter · Cylindrical stem•: 5mm aluminum · Carbon fibre strip of longitudinal fibers* (cut from the tube of a kite or a tent pole) or cane (Canne de Provence - arundo donax) ·
Polyester thread: 0.5 mm approximative diameter
* carbon fibre comes is a wide variety of forms and binder. Blades or tubes consisting of longitudinal fibres are fine.
Tools
**Small dimensions require precise tools such as those designed for model makers:
· Workbench mill · Cross feed table vice · Calibrated vice · Belt sander · Metal saw · Flat file · Scalpel · Garden secateurs/prunding shears (anvil cutter with a flat bed) to cut carbon fibre without making shards or splitting cane. · Super glue · Precise measurement tools such as verniers or calipers
Making the body of the Reed
The reed bodies, regardless of whether they are for the chanter or the drone, have the same dimensions. Therefore it’s good to make them all together as this will save you a lot of time.
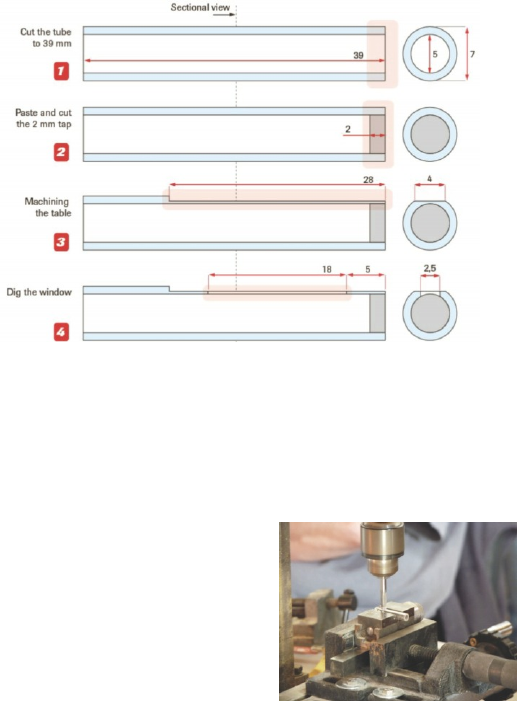
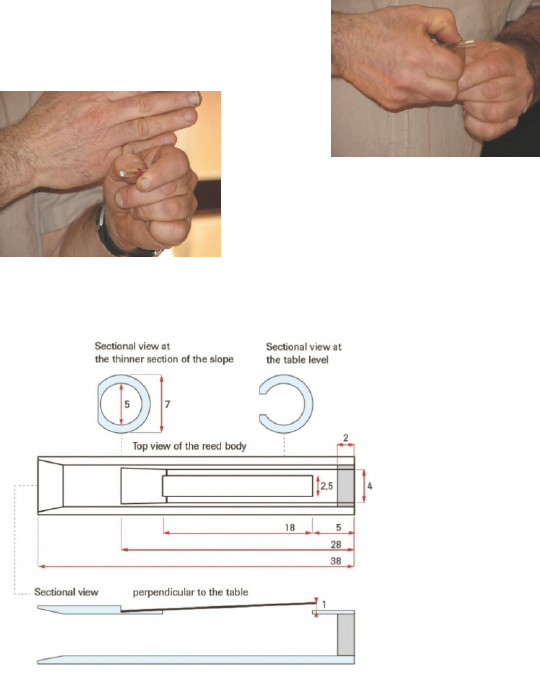
- Grip the plexiglass tube lightly in a vice in order to turn it and cut with a metal saw at 39 mm (leave 1 mm extra greater than the final dimension). Clean the cut with a scalpel.
- Put a drop of Superglue right on the end of the tube and quickly, without turning, put the aluminium stem two millimeters inside. Cut the aluminium stem once the glue has set and the plug must be 2 mm wide. Check that the reed body is air tight and add more glue if necessary.
Making the flat reed bed.
- The tube is fixed on the precision vice, which is itself fixed on the cross feed table vice. Everything needs to be precisely adjusted so that the reed is parallel to the course of the mill. With a 6mm diameter drill mounted on the workbench mill, make the flat of the reed. Always mill in the same direction by succesive passes. Be aware that the fibreglass burns or melts easily, so use very sharp tools and a slow cutting speed.
The width of the flat (4 mm) determines the depth of the cut.
Keep a margin to realize the angle of the following step. The width of the flat is 4mm (+/- 0.2mm) and 28mm long. Note that plexiglass tubes do not necessarily have a regular inside diameter. The flat should be on the thickest side.
A possible manual method•: Paste some sandpaper (180 -150 grade) on a hard and flat surface. Sand with careful and regular gestures. Your objective is a flat and rectangular surface with a smooth aspect.
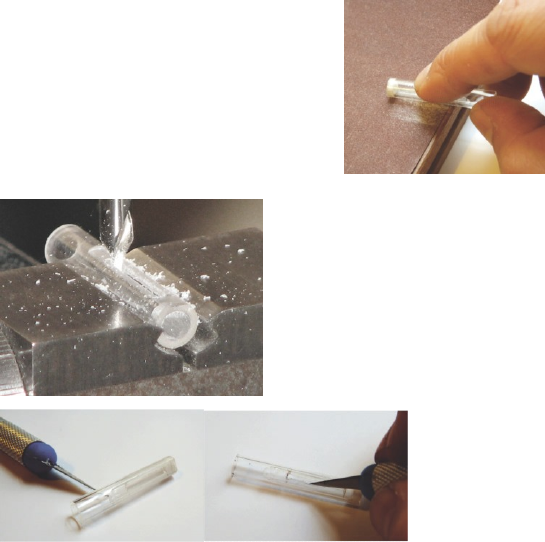
The Window/Opening
- The window is dug out in the centre of the flat using a centering drill bit. It must measure between 2.0 -2.5mm wide and 18mm long, at a distance of 5 mm from the end of the reed plug.
Manual method•: Take a scalpel and insert and cut into the thinnest part in the center. Then, cut very thin slices towards the sides. If you have a Dremel and are skilled in using it, you could use a circular saw attachment. The ends of the finished aperture can be round or angular but the dimensions have to be precise.
The reed tongue: cane or carbon?
The choice depends on the available materials, the ease of use, the search for specific tones but both materials give similar results. Carbon is more stable to humidity, more solid but more difficult to work. The fibre can cause irritation, even eye injuries. Cane is simplier to work, neutral to the touch but needs to ‘rest’ between the each stage of making. The adjustments are more time consuming.

Making a cane reed tongue.
- Use a solid piece of cane, 7.00mm or 8.00mm diameter, (it should withstand crushing between the thumb and index finger) which has a good polished outer surface. From the tube, cut a section which is a third of the total diameter, then sand the inside until you get a flat and perfect surface. Sand the exterior more delicately (180 grade sandpaper) until you get into the region of 4.00mm thick. Then, sand the interior side to get a 0.4mm thickness. Control the eveness of the thickness by regularly holding it up against a light. Cut the vibrating part so it goes beyond the window by 0.5 mm. The anvil garden cutters limits the risks of splitting the fibres when cutting to length. Cut the sides to obtain a 4.0mm wide vibrating part. The polished side of the cane goes normally on the flat of the tube but choose the side that naturally bends upwards. On a piece of boxwood, smooth this side of the reed tongue. It’s best to prepare several reed tongues together and then the cane must rest for at least 24 hours between two making stages.
Producing the carbonfibre reed tongue
- Carbonfibre is harder but it’s worked in a similar fashion to cane. One must take precautions to avoid being wounded by any of the fibres and its recommended that you should wear a mask when sanding. Also wash your hands often to get rid of any fine particles. Robert uses flat carbonfibre strips which are 5.00mm wide and 0.5mm thick. Cut the strips to 24-25mm, leaving a little margin. To adjust the width, use sandpaper rubbed in the same direction as the fibres. The strips are usable immediatly.
To manually cut carbonfibre to the specific thickness, place the strip on the edge of a hard surface and press firmly with a sharp blade. Strips of various dimensions can be obtained from model maker shops.
Adjusting the reed body and assembling
Make sure that the reed body is 38mm long with a 2 mm plug. Slightly widen the end of the body, to create a flare, by using a scalpel (see Stage 6 on the diagram) and then sand off.
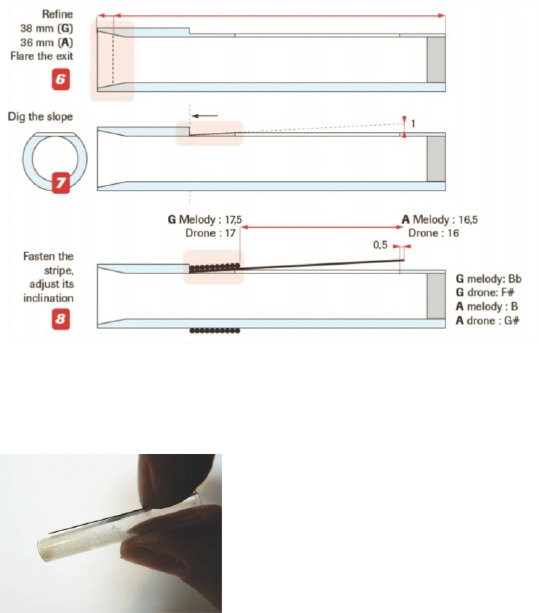
Place the reed tongue on the flat surface of the tube, paying attention to any natural up-turning curvature in the strip. The following steps are key in making a successful reed.
- Taking into account any natural curvature, make a slope at the end of the reed tongue so that when held in place, the tongue rises about the flat surface by about 1.00mm. This can involve making several attempts to get it right, so take your time and make a number of them. These dimensions are very fine as the depth will be determined by the thickness of the tube. However, the angle must be sufficiantly pronounced and the surface big enough to allow a fine adjustment of the slope. Consequently , it must be as deep as possible and long enough for the total length of the tongue. Firmly hold the strip on the slope with the finger. This next bit needs some dexterity as you need to be able to hold the tongue and wrap the thread tightly. With the narrow tube it can be difficult to hold the tongue precisely in place.
When in place you can test the reed by placing it in your mouth and blowing. The resulting sound must be easy and clear, using a reasonable pressure without any odd sound or blockage. The reed must always sound when blown through. From now on, one can get the sense of the potential of the reed.
First Adjustment
- Once you can be sure that the first set up allows the reed to to vibrate, secure the thread and wind the thread very tightly from the end of the reed tongue and wrap progressively to the edge of the window. The ligature will control the opening of the reed and you will need to tighten it until you reach the desired sound. If the sound is weak or if the reed stops sounding, raise the strip by increasing the slope/angle. If the sound is too loud, or irregular/screeching when blowing, then lower the strip by tightening. the ligature. If the slope cannot be increased and/or the sound stays hard, then you will need to thin the strip. Robert Matta has set tongue dimensions which will allow the reeds to work by setting the angle. This steamlines the making of them. If a tongue proves difficult to settle, it is easy to adjust it. With practice you will be able to anticipate the state of the reed at this stage; for the melody reed you will have to achieve a Bb which is clear, stable, sonorous with good harmonics. If you can’t get a good Bb at this stage then there is no point putting the reed in the chanter. If the reed is too hard, then scrape the entire length of the tongue which will soften it.
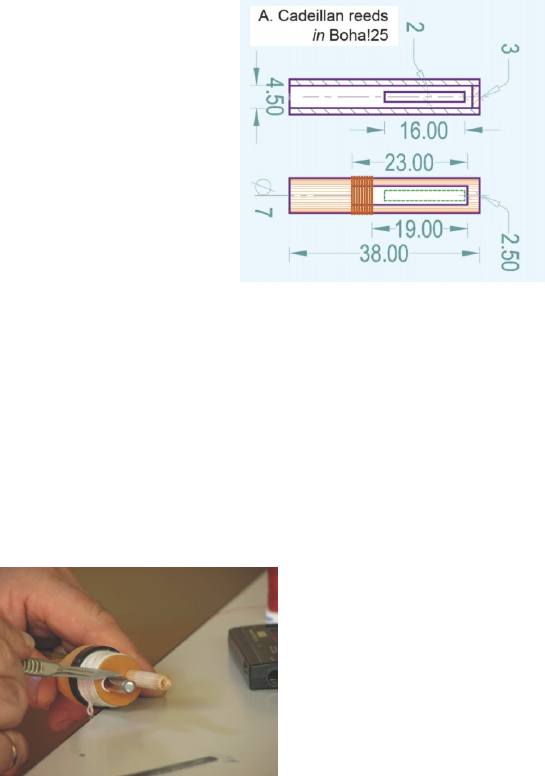
The length of the tongue, as well as its angle, can impact greatly on performance and range of notes which can be obtained. The ligature will determine both of these factors. A length of 17.5mm for the vibrating part of the tongue is desirable.
These dimensions correspond to Robert’s current chanters. With different drills it could be necessary to slightly modify them. This is confirmed by the measurements of the G-reeds made by Alain Cadeilhan (Kachtoun).
Adjust the reed to the chanter
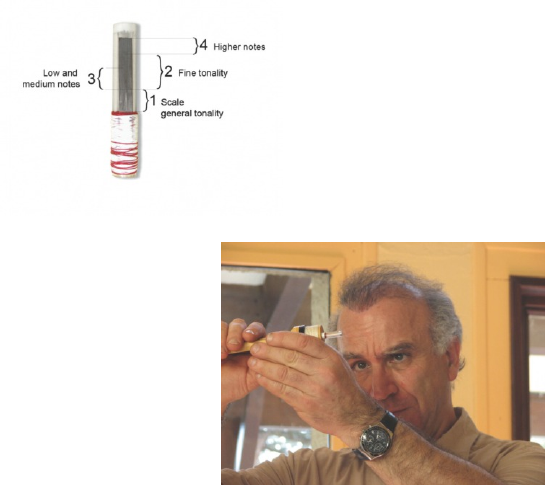
Wind the thread around the base of the reed so that it fits tightly into the bore of the chanter. Glue the thread with a touch of Superglue, wrap two times around the thread with teflon (carefully flat). The reed must slide easily without being forced whilst also staying firmly inthe chanter. Blow with the mouth and adjust the fundamental note by moving the reed in or out. Work on the inclination/angle and the tension of the ligature to approximate the scale, to ensure power, clarity, roundness and stability of sound . It’s possible to do several differne things to improve the sound; each of them will have a greater or lesser impact on sound, stability, tone etc… think well before acting.
For example, if the scale is too extended (the highs are too high) then the strip is too stiff, so you can reduce the thickness (which will be irreversible) or tighten the ligature towards the heel to lengthen the vibrating length (which is reversible). Reducing the thickness of the strip is also necessary if one wants a ‘round’ sound or to make it easier to sound. On the contrary, lengthening the vibrating strip can make notes unstable or screechy. Proceed with light touches, cut with sufficiently long rests in between to allow the reed to stabilize.
These steps are a guideline and you will need to make both subtle and personal adjustments to suit. Different pressures on the bag will also have an impact. So you will have to make many reeds which, by default, will present slight differents and only you can decide which is the best approach. Sharing your experiments with other manufacturers could help a lot.
Regulating the scale
Robert Matta’s method consists of removing the material off the strip to adjust the notes. For each note there is a corresponding zone on the strip; The bass notes towards the thread, the high notes towards the plug. The thickness of the strip by the thread has the most influence on the general equilibrium of the reed, so one should adjust the low G first. Use a scalpel for the scraping with a gentle, little, successive touch. Cane reacts more quickly than carbon by doing that. If the range becomes too high and short, one may have to change the strip. As soon as the range gets close to the right sound, put the chanter into the bag to continue the adjustment. Close off the hole of the drone with an 8mm wooden plug and take your time in between two adjustments. Continual adjustments can ‘tire out’ the reed so it is best to leave a gap of 24 hours between stages when working with natural cane. When you think you have almost set the reed as well as you can, do the same to the drone reed in the same way so that it reacts to the same pressure as the chanter reed. Put the reed into the drone and adjust that two reeds (chanter and drone) so that they sound G together. Then fine tune each of the chanter notes against the drone G.
Reed’s memory
During a playing session, the reeds can go out of tune but then will stabilize in the long term. This is particulary true for cane reeds which are very sensitive to humidity. Overtime the fibres will become used to this process and will stabilise and so, for this reason, you must look for reasonable results which correspond to the age of reed. In time, the reed will become more and more reliable and there will be less movement. If the reeds have been correctly made, they will tend to be balanced throughout the playing session. A regular and precise pressure will be enough to make the sound round and balance out the tuning. Whilst the plexiglass body of the reed is not sensitive to humidity, it does react to condensation. Adjusting the set up with the mouth, or when it is cold, droplets of water can form inside the tube that can affect the tuning and range. Moreover, impurities can accumulate in the body of the reed especially under the strip. To resolve this, clean the inside body of the reed with a cotton wool bud. Clean the underneath of the tongue by sliding a piece of fine paper along the length of the tongue. Do this gently in order to not damage the fibres of the tongue.
And now…. To your scalpels!
Observations from Fred Vigouroux:
I have experimented with making idioglotte reeds (from the same piece of cane) and those with tongues since 1993; Cane, elder, plastic, carbon, aluminium and plexiglass. I have achieved mixed success with the idioglotte cane. Robert’s demonstration allowed me to make a G chanter play with a comfortable pressure after a dozen attempts.
Plexiglass is easily glued with superglue but this glue is aggressive. One should use a very minimal amount. Plexiglass is very sensitive to abrasion, is easily polished (fine sand paper). Both plexiglass and carbon fibre strips can be found on eBay.
The incline of the strip and the equilibrium of both reeds, seem to me, the most subtle to master. The search for the the right cane is a challenge: Humming, warm, supple, biting ,nasal, powerful… My attempts have produced very different results. Experience has shown that one has to search from the very first stage of making, a certain freedom in the vibration of the strip while varying the opening( inclination, stiffness etc.).
This article was first published in Boha! 30-Bohaires de Gasconha 2012 English translation: Robert Matta, Frédéric Vigouroux & Jane Moulder Photos from Yves Pouysegur and F. Vigouroux, drawings F.V.
Something wrong or missing from this page? Let us know!