The Bagpipe Society
Tools of the Trade - A custom made Stebcentre
A custom made Stebcentre
Over the last ten years I have made a number of jigs, fixtures and small tools that are solving small problems in the manufacturing processes of my pipemaking. Most of them are for a very specific task and therefore useful, but they may only be in action for a few times per year. The tool I want to present in this article is quite the opposite, it’s in use on any kind of instrument a make, and it has really speeded up my work flow. Before I go into details, I should probably explain why I made it, to point out its benefits.

Over the year 2019 I started thinking through my way of production and finally decided to change a few things. One idea was to prepare all instruments I want to make for the forthcoming year at once. This means drilling them, rounding over the blanks to a cylinder and gluing on all mounts. After having made this decision, I started thinking about how to do this as fast as possible. The best way I found with my setup in the workshop, was drilling the bores when the wood was still square, roughly rounding them over on the wood lathe, and letting the metal lathe run meanwhile with automatic feed to create perfect cylindrical blanks. Of course, there are many ways to clamp stuff on a lathe, but centring a bore that might be drilled a bit out of centre is quite a specific task. I was searching for a way to clamp the parts securely, in the best case in the way that I could change the part without stopping the machine. I then came across something called “Live Stebcentre” which is a spring loaded centre with small teeth biting into the end grain of the blank. As usual, a smart idea, but not available in bagpipe making specifications. So, I needed to make one myself.
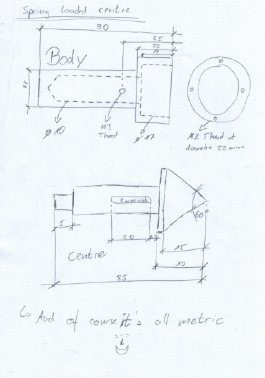
First of all, I had to think through the final measurements of my blanks, in this case bore size and outside diameter, and how big the hole in the mount I will glue on later on will be. The goal was to develop a tool that could cope with bore sizes from 4 to 16mm and leave marks of the teeth that grab the wood outside a 20mm diameter. Given those measurements I started sketching up the tool.
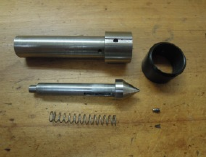
It consists of two main parts; one is the body that’s clamped in a chuck and the other is the centre that is sliding in the body when the blank is inserted. The centre is spring loaded and held in place with a small screw that’s screwed into the body allowing it to run in a slot in the centre itself. This function makes it possible to centre the bore, but still I needed something like the teeth of the “Live Stebcentre” I got the idea from.

I ended up with small M2 Allen key screws, which I filed to a point and screwed into the body, so that the points protrude out of the face.. Four of them are enough to securely bite into the wooden blank. By tightening up the tailstock, the small protruding points bite into the wood but don’t restrict the revolving centre in the tailstock from pressing into the other end of the blank and this is a really good result. Also, the marks of the teeth were turned away later on when turning on a tenon for the mounts.
After rounding over a few squares, I recognized that the biggest diameter of the body which is 25mm works very good as an orientation if you want to turn a blank down to a diameter slightly bigger than the given 25mm. As soon as the diameter of the blank gets way than this, the system didn’t really work anymore.
So, I made another add-on. I milled in a slot and drilled a small hole in the outside of the body, and made a few plastic rings with another small screw in them. The slots function is to lead the screw to find its way into the hole. Now I was able to screw on those plastic rings, turn them down to any diameter bigger than 25mm that I wanted to have as an orientation for other blanks.
I hope you enjoyed this description, and maybe make yourself a copy of the tool. If you do so, sent me a picture, I would be very interested in your improvements.
From Chanter Summer 2020.
- Data Processing Notice (GDPR)
@BagpipeSociety on X (formally known as Twitter)
TheBagpipeSociety on Instagram
 BagpipeSociety on Facebook
Something wrong or missing from this page? Let us know!
